If you’re a tennis player, no matter if you play for fun or professionally, you know that having a perfect tennis racket is essential. In truth, it’s important for all tennis equipment to be of high-quality and durable, but this especially applies to a racket because, without it, there is no way to win.
With that being said, finding a racket that will fit your needs perfectly can often prove challenging. Sports equipment companies tend to mass produce rackets and other sports equipment, and they produce these products to satisfy most players out there.
However, since every player is different and has different preferences, you can see how purchasing the ideal racket can be challenging. You don’t have to stress, though! There is a solution.
Although buying the perfect racket might not be possible, customizing the one you have or buy is an excellent solution. The best and most efficient way you can customize the racket to fit your needs better is to add lead tape to it.
To save you from the unnecessary hassle of trying to find guides on how to use lead tape on your tennis racket, we summarized all the info for you! You can read our streamlined step-by-step guide to learn how to use lead tape on your tennis racket in a flash! Forget about wasting time and find all the info below.
A Quick Guide on How To Use Lead Tape on Your Tennis Racket

Using a lead tape on your tennis racket can help you play with a lot more ease than you used to. It is the easiest way to improve your racket and give you perfect balance and control over the shots.
You probably already heard about placing the tape on your racket handle, but that isn’t the only place where you can add it. You can add lead tape to several places on your racket, depending on what exactly you want to customize and improve. Take a look at the list below to see where you can place the tape and what you can expect from it:
1. The Top of the Frame
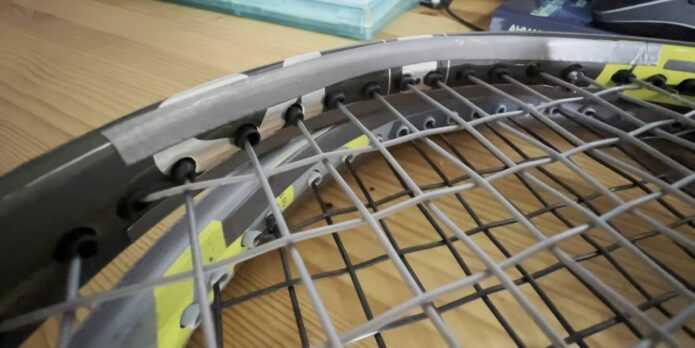
If you’re looking for a way to boost the power you can generate with your racket, placing the lead tape on the top of the frame is your best option. You should add it to the top of your racket head, either to the frame or under the grommet.
Peel back the protective strip and add the tape slowly to these places until you’re satisfied with the results. The swing weight of your racket can also be increased proportionally by adding weight at 12 o’clock. This will also make your racket more head heavy if that is something that you want to achieve.
2. The Sides of the Frame

Now, if you want to add more stiffness and stability to your racket, the sides of the frame are the places where you should add lead tape. Place the lead tape carefully to the sides at 3 and 9 o’clock, but try not to go overboard with it.
That way, you will be able to reduce the flex and unnecessary vibrations, as well as boost the racket’s torsional stiffness. Adding lead tape to the sides of your racket is another way to increase your racket’s swing weight, although not as dramatically as adding it to the top would do it.
3. Racket Throat
You can also use lead tape to add a smaller amount of weight and swing weight to your racket without impacting the balance point. The best way to do that is to place the tape on the throat of your racket. Since you’ll be adding the tape and mass to the middle of your racket and that is the place of the balance point, it will have minimal impact on balance.
All you need to do is put the tape strips on the throat of your racket until you’re happy with how it feels, but also looks. You don’t want to add too much since it can look aesthetically unpleasing, so take that into consideration when you’re doing this as well.
4. Racket Handle

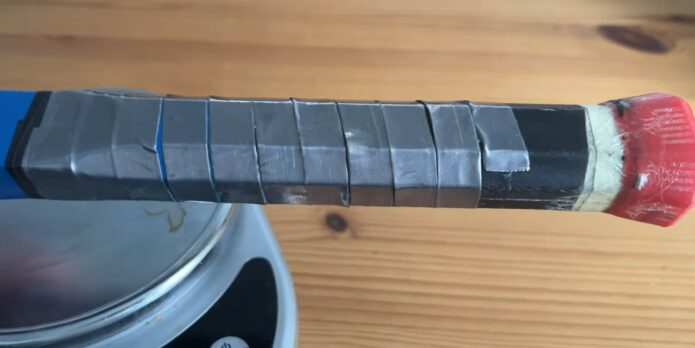
The last place where you can add lead tape is the handle of your racket, and this is mostly done to increase the agility, as well as the whippy feel of it in your hand. If you want to retain a solid and stable feel of your racket, this is a perfect choice. It is especially beneficial if you are on the net and in need of reacting quickly and efficiently.
Placing the tape on the handle is as easy to do as with the previously-mentioned places, if not easier. Simply remove the protective non-adhesive strip and place the tape around your handle. You have to be careful with how much you add, though.
Putting too much tape can change the way your handle feels, so it can be more difficult to use the racket properly and have enough control and balance when using it.
Check out this video for more tips on how to add lead tape to your racket:

Takeaways
It is very important to remember that removing any tape that you had on your racket is essential before adding a new one. Having a racket that fits your needs perfectly means customizing every part of it exactly how you want to, so to that end, you can experiment and try a few different approaches before you decide what works best.
You can add more tape to your handle and less to the throat, and vice versa. Once you place the tape, try playing tennis with that racket and see whether you’re 100% happy with the results and the feel of it.
Take a quick look at some of the health benefits of playing tennis.
If you aren’t, remove the tape and try a different approach until you find the perfect solution and you have no issues playing whatsoever. It may take a bit of time and effort, but it will definitely pay off once your start dominating the court and beating your opponents left and right!
References:
https://woman.thenest.com/add-weighted-lead-tape-tennis-racket-2274.html
Related:
- Top 19 Best Tennis Bags 2024 [Unbiased Reviews]
- 20 Best Tennis Shoes 2024 - Stylish and Athletic
- 18 Best Tennis Racquets 2024 - Exclusive Reviews &…
- 15 Best Tennis Balls 2024 - USTA and ITF Approved
- 15 Best Tennis Racquet for Beginners & Intermediate…
- 10 Best Tennis Ball Machine 2024 - Perfect for Solo Players


